Tuesday, October 21, 2008
 Installing a DVD/CD Optical Drive
Tuesday, October 21, 2008 | Posted by
henis |
Edit Post
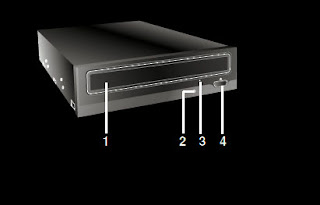
Front Panel
2. Drive activity indicator (Read/Write)
3. Emergency Eject Hole
4. Stop/Eject Button
3. Emergency Eject Hole
4. Stop/Eject Button
Rear Panel
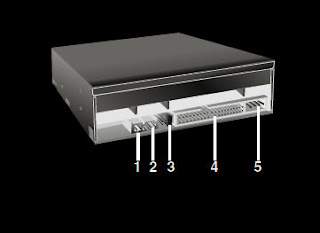 1. Digital Audio Output Connector
 This connector is not usually required or supported by the device.
2. Analog Audio Output Connector
Connect to a sound card. This connection is not normally required.
3. Jumper Connector
This jumper determines whether the drive is configured as the master or slave drive.
4. IDE Interface Connector
Connect to the IDE (Integrated Device Electronics) Interface using a 40-pin flat IDE cable.
NOTE : Do not connect or disconnect the cable when the power is on, as this could cause a short circuit and damage the system. Always turn the power OFF when connecting or disconnecting this cable.
5. Power Connector
Installing the Drive
Before installing the drive, please note the following points.
■ You will need the following:
• A screw driver of a suitable size to fit the securing screws for the drive unit.
■ Turn off all peripheral appliances (printer, scanner, etc ) of the computer and the computer itself, and disconnect their power cords from the wall sockets.
■ Discharge any static electricity in your body by touching any unpainted part of the computer covers, etc.
Removing the Computer Cover
Make sure all peripheral devices (printer, scanner, etc ) of the computer and the computer itself are turned off, and then remove the cover. Refer to your computer manual for details about removing the cover.
NOTE : There may be sharp edges inside the computer so take care to avoid injury.
Mounting the Drive
1. Remove the 51/4″ drive bay panel from the computer. Refer to the manual for the computer for details.
2. Insert the drive unit into the bay, you may have to remove the ram chips if there is not enough room. Do not apply excessive pressure to the cables inside the computer.
3. Secure the drive with the screws. If there is not enough space behind the drive, connect the IDE and other cables before securing the drive.
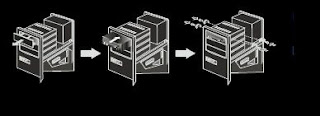
NOTE : This is a general installation guide. If your PC hardware appears different, please consult your
hardware manual for installing peripheral devices.
Jumper Setup
Before installation, set the jumper on the jumper connector on the rear panel.
The drive can be connected as the Master or Slave on an EIDE (ATAPI) interface. When several (up to four) EIDE devices are connected, each must be set in a unique way. Specific knowledge of hardware and software is necessary to install the drive.
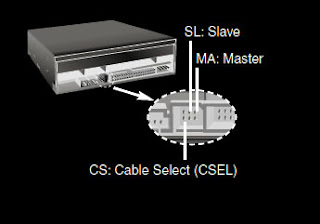 NOTE : If two peripheral devices with the same settings are both connected to the Primary or to the Secondary EIDE bus, the computer may fail to run or may malfunction. Careful attention is necessary.
 NOTE : Only one jumper should be installed on the jumper connector.
If more than one jumper is installed, the drive may malfunction or be damaged.
Master/Slave setting is determined by jumper installation on the Jumper Connector.
The following table shows the possible jumper settings.
If you use CSEL (cable select) setting, the MASTER/SLAVE setting will be made automatically, depending on the hardware configuration. For more details refer to the manual for your computer.
PC Connection
The drive connects to the motherboard of the computer using an IDE interface cable.You can connect the Drive as a Slave or Master device, depending on your motherboard.
To Install as a Master Drive
To install the drive as a Master, the jumper can be left as supplied from the factory, which is their default setting.
NOTE : A hard disk is normally installed as the Primary Master on the EIDE (ATAPI) interface. Other EIDE peripheral devices such as second hard drives and DVD/CD-RW Drives are then set differently.
To Install as a Slave Drive
To install the drive as a Slave drive, change the jumper setting on the rear panel to SL.
Connecting the Power Connector
Connect the power cable from the computer’s power supply to the socket on the drive unit, fitting the connector firmly into the power in connector. If there is no spare power cable available in the computer, you will have to purchase a splitter cable of the same type.
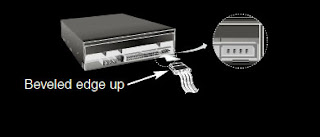 NOTE : Not connecting the power cables correctly can damage the drive. Normally, the
 power connector can only fit one way.
Connecting the Interface Connector
Connect the 40-pin IDE cable to the back of the Drive, making sure the coloured (red) stripe on
the IDE cable is connected to pin 1 on the drive. Pin 1 is closest to the Power Connector.
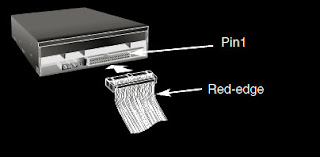
NOTE : normally, the IDE connector is keyed
and will only fit one way.
Connecting the Sound Card
If the computer is using a sound card, the drive is connected to the sound card with an audio
cable. The supplied analog audio cable fits most sound cards or one can be purchased at a local
computer store.
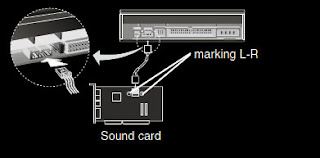 Refer to the manual for the sound card
 for detailed information regarding this
connection.
Replacing the Computer Cover
When the installation of the drive unit is
complete, replace the computer cover.
Device Drivers
When using Windows 2000 Pro/XP or Window NT Workstation Ver. 4.0, no special device driver is required. Your system will find and install the drivers, upon Power On and bootup after installing and connecting the new drive, will recognize and load software drivers automatically.
The DOS and Windows 3.1 users can download the DOS Device drivers via the Internet.
For Windows 2000 Pro/XP Users
.■ In order to ensure normal drive operation, please check the following:
• The drive is displayed in
Windows 2000 Pro/XP : [Control Panel]-[System]-[Hardware]-[Device Manager]-
[DVD/CD-ROM-Drive]
• 32-bit is displayed in [Control Panel]-[System]-[Performance]
■ If the drive is not recognized by your computer, please check the following items.
• If an indicator is displayed on the IDE controller in [Control Panel]-[System]-[Device
Manager]-[Hard Disk Controller], you will need to contact your PC’s manufacturer or the
motherboard’s manufacturer and get the appropriate IDE controller driver.
■ Run Add New Hardware in Control Panel to let PC search again for new device.
For Windows NT Workstation Ver.4.0 Users
■ In order to ensure normal drive operation, please check to see if the drive is displayed on
the IDE controller in [Control Panel]-[SCSI Adapter]-[Device]
■ If the drive is not recognized by your computer, an indicator is displayed on the IDE
controller in [Control Panel]-[SCSI Adapter]-[Devices], you will need to contact your PC’s
manufacturer or the motherboard’s manufacturer and get the appropriate IDE controller driver.
How to Use Disks
When using CD-ROM discs or DVD discs, don’t put any stickers or labels to the discs. Using
discs with them attached will cause read and write errors and also damage the disc.
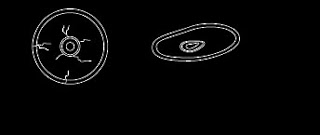 The Discs in DVD/CD drives rotate at a very high
 speed! DO NOT use damaged, cracked or
warped discs. The drive’s optical unit may be
damaged if they break.
Emergency Eject
Most DVD/CD drives have a feature that allows the CD to be ejected manually if necessary such as failure of the drive or a power outage.
NOTE: Don’t use this feature except in an emergency.
1) Turn the power to OFF.
2) Poke a fine-tipped object (such as a straightened heavy duty paper clip) into the small hole
above the eject button. The front door will pop open and the disk tray will come partway out.
3) Pull the front door to open it all the way, then grip the disc tray between thumb and forefinger and pull it straight out.
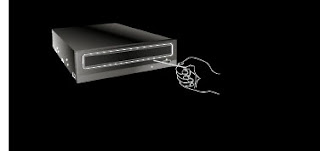 NOTE: This feature is a last measure to
 be used only in an emergency.
Using it excessively will cause the drive to malfunction.
Troubleshooting a DVD/CD Drive
• The drive doesn’t have power.
• Is the power supply cable from the host computer plugged in?
• Is the Power Connector to the drive securely attached?
• The system doesn’t start.
• Are the Primary and Secondary connections and the Master and Slave settings correct?
• Is the total length of the IDE cable 18 inches or less?
• Is each connector completely attached?
Movement of the PC may loosen connections.
• Cannot Read or Write Discs.
• Is the condition of everything else in the system (CPU, hard disc, and others)
as it should be?
• Does the CD, DVD disc have dirt or scratches?
• Did a screen saver or other application operate while writing to the disc?
• Is there enough free space on the CD, DVD disc?
• Does writing fail even using the simulation test?
• Is the disc loaded in the drive with the read/write surface facing the right direction?
(label up)
• Is the drive installed in the correct orientation?
• Was the drive or disc moved from a low temperature environment to a high temperature
environment? (There is a possibility of condensation on the lens in the drive or on the
surface of the disc.)
Subscribe to:
Post Comments (Atom)
Posts
- Solve Boot Issues
- Windows 7 Tips And Tricks 3
- Windows 7 Tips And Tricks 2
- Windows 7 Tips And Tricks
- Security In Windows
- Maintaining Windows
- Windows XP Interface
- Computer Acronyms Explained
- Restoring Windows XP to a Previous State
- How to Repair Windows
- Protecting Yourself, Your Hardware, and Your Software
- Google Search Secrets
- How To Test Your Anti- Virus Scanner
- Installing a DVD/CD Optical Drive
- 10 reasons why PCs crash, you must Know
- Windows Updates
- 100 Keyboard Shortcuts For Windows
- computer maintenance
computer repair and maintenance >
computer problems >
computer repair and maintenance >
windows-7-taskbar >
internet_explorer_update >
daf93_upgrade-windows-xp-to-vista-033 >
Windows-7-Installation-screen >
Windows-7-Installation-Screen >
Choosing-the-Windows-7-installation-type >
Specify-a-location-for-installing-Windows-7 >
Adding-a-username-and-computer-name >
Password-screen >
Windows-Update-and-security. > Choosing-a-network-location
>
turn-on-automatic-updating > Checking-for-updates
>
configure-Windows-Updates >
Windows Update-View Update History >
computer repair and maintenance >
computer repair and maintenance >
computer help > computer problems
>
computer problems >
computer problems > computer help >
computer problems >
pc repairs >
computer technician >
computer problems >
computer problems >
computer technician >
Add to Technorati Favorites >
computer problems > Site
Meter >
pc repairs >
computer problems >
computer help > computer help >
facebook. > twitter. > digg. > Rss feed.
Any Queries
If you have any questions or hints and tips of your own, you can leave them in the comments section, cheers Shane.




0 comments:
Post a Comment
Thank you for commenting on my blog, if you leave your URL somewhere in your comment i will visit your blog and leave a comment as well, cheers Shane.