 Computer Acronyms Explained
ADSL - Asymmetric Digital Subscriber Line
AGP - Accelerated Graphics Port
ALI - Acer Labs, Incorporated
ALU - Arithmetic Logic Unit
AMD - Advanced Micro Devices
APC - American Power Conversion
ASCII - American Standard Code for Information Interchange
ASIC - Application Specific Integrated Circuit
ASPI - Advanced SCSI Programming Interface
AT - Advanced Technology
ATI - ATI Technologies Inc.
ATX - Advanced Technology Extended
B
BFG - BFG Technologies
BIOS - Basic Input Output System
BNC - Barrel Nut Connector
C
CAS - Column Address Signal
CD - Compact Disk
CDR - Compact Disk Recorder
CDRW - Compact Disk Re-Writer
CD-ROM - Compact Disk - Read Only Memory
CFM - Cubic Feet per Minute (ft�/min)
CMOS - Complementary Metal Oxide Semiconductor
CPU - Central Processing Unit
CTX - CTX Technology Corporation (Committed to Excellence)
D
DDR - Double Data Rate
DDR-SDRAM - Double Data Rate - Synchronous Dynamic Random Access Memory
DFI - DFI Inc. (Design for Innovation)
DIMM - Dual Inline Memory Module
DRAM - Dynamic Random Access Memory
DPI - Dots Per Inch
DSL - See ASDL
DVD - Digital Versatile Disc
DVD-RAM - Digital Versatile Disk - Random Access Memory
E
ECC - Error Correction Code
ECS - Elitegroup Computer Systems
EDO - Extended Data Out
EEPROM - Electrically Erasable Programmable Read-Only Memory
EPROM - Erasable Programmable Read-Only Memory
EVGA - EVGA Corporation
F
FC-PGA - Flip Chip Pin Grid Array
FDC - Floppy Disk Controller
FDD - Floppy Disk Drive
FPS - Frame Per Second
FPU - Floating Point Unit
FSAA - Full Screen Anti-Aliasing
FS - For Sale
FSB - Front Side Bus
G
GB - Gigabytes
GBps - Gigabytes per second or Gigabits per second
GDI - Graphical Device Interface
GHz - GigaHertz
H
HDD - Hard Disk Drive
HIS - Hightech Information System Limited
HP - Hewlett-Packard Development Company
HSF - Heatsink-Fan
I
IBM - International Business Machines Corporation
IC - Integrated Circuit
IDE - Integrated Drive Electronics
IFS- Item for Sale
IRQ - Interrupt Request
ISA - Industry Standard Architecture
ISO - International Standards Organization
J
JBL - JBL (Jame B. Lansing) Speakers
JVC - JVC Company of America
K
Kbps - Kilobits Per Second
KBps - KiloBytes per second
L
LG - LG Electronics
LAN - Local Are Network
LCD - Liquid Crystal Display
LDT - Lightning Data Transport
LED - Light Emitting Diode
M
MAC - Media Access Control
MB - Motherboard or Megabyte
MBps - Megabytes Per Second
Mbps - Megabits Per Second or Megabits Per Second
MHz - MegaHertz
MIPS - Million Instructions Per Second
MMX - Multi-Media Extensions
MSI - Micro Star International
N
NAS - Network Attached Storage
NAT - Network Address Translation
NEC - NEC Corporation
NIC - Network Interface Card
O
OC - Overclock (Over Clock)
OCZ - OCZ Technology
OEM - Original Equipment Manufacturer
P
PC - Personal Computer
PCB - Printed Circuit Board
PCI - Peripheral Component Interconnect
PDA - Personal Digital Assistant
PCMCIA - Peripheral Component Microchannel Interconnect Architecture
PGA - Professional Graphics Array
PLD - Programmable Logic Device
PM - Private Message / Private Messaging
PnP - Plug 'n Play
PNY - PNY Technology
POST - Power On Self Test
PPPoA - Point-to-Point Protocol over ATM
PPPoE - Point-to-Point Protocol over Ethernet
PQI - PQI Corporation
PSU - Power Supply Unit
R
RAID - Redundant Array of Inexpensive Disks
RAM - Random Access Memory
RAMDAC - Random Access Memory Digital Analogue Convertor
RDRAM - Rambus Dynamic Random Access Memory
ROM - Read Only Memory
RPM - Revolutions Per Minute
S
SASID - Self-scanned Amorphous Silicon Integrated Display
SCA - SCSI Configured Automatically
SCSI - Small Computer System Interface
SDRAM - Synchronous Dynamic Random Access Memory
SECC - Single Edge Contact Connector
SODIMM - Small Outline Dual Inline Memory Module
SPARC - Scalable Processor Architecture
SOHO - Small Office Home Office
SRAM - Static Random Access Memory
SSE - Streaming SIMD Extensions
SVGA - Super Video Graphics Array
S/PDIF - Sony/Philips Digital Interface
T
TB - Terabytes
TBps - Terabytes per second
Tbps - Terabits per second
TDK - TDK Electronics
TEC - Thermoelectric Cooler
TPC - TipidPC
TWAIN - Technology Without An Important Name
U
UART - Universal Asynchronous Receiver/Transmitter
USB - Universal Serial Bus
UTP - Unshieled Twisted Pair
V
VCD - Video CD
VPN - Virtual Private Network
W
WAN - Wide Area Network
WTB - Want to Buy
WYSIWYG - What You See Is What You Get
X
XGA - Extended Graphics Array
XFX - XFX Graphics, a Division of Pine
XMS - Extended Memory Specification
XT - Extended Technology
 Restoring Windows XP to a Previous State
This post will describe how you can use the system restore tool, to restore your computer to a previous state. system restore takes a snapshot of critical system files, program files as well as the registry settings and stores this information as restore points for the operating system. Lets say you downloaded a piece of software from the Internet and you installed the software, only to discover the software has spy-ware or a virus, now your computer is running slow and you have pop ups appearing constantly. You can use the system restore points to recover your computer to a state before you installed the offending software. System restore can also change scripts, batch files and executable (exe) files on your computer.
Note: System restore will not delete any of your personal files, also system restore will not restore these files if they have been deleted. You must be logged on as an administrator to be able to use system restore.
How to use System Restore
Log onto Windows as an Administrator.
Click start/all programs/accessories/system tools then select system restore.
On the welcome to system restore page, select restore my computer to an earlier time and click next.
On the select a restore point page, click the most recent system restore point from the, on this list, or select an earlier date from the, on this calendar, then click next.
A system restore message may appear which lists any configuration changes that system restore will make, click OK.
On the confirm restore point selection page, click next. System restore will then restore the previous windows configuration , and your computer will reboot.
Log onto the computer as administrator, the system restore, restoration complete page will be displayed.
Click OK.
IF system restore could not restore your computer to an earlier time, you then should try using system restore in safe mode. Some viruses and Trojans will prevent system restore from restoring your computer, using safe mode will prevent these from starting with your computer.
Undoing a System Restore
If you want to undo a system restore, follow these steps.
Log onto windows as an administrator.
Click start/all programs/accessories/system tools, then select system restore. On the welcome to system restore page, click undo my last restoration, then click next.
A system restore message may appear with a list of configuration changes that system restore will make, click OK.
On the confirm restoration undo page, click next. system restore will then restore your computer back to the original windows configuration and then reboot.
Log onto the computer as an administrator. the system restore undo complete page will appear.
Click OK.
 How to Repair Windows
If your computer can't boot into windows XP or 2000 or even into safe mode, if you only get a blue screen or your computer just hangs, then performing a system repair may fix the problem. This will allow you to repair your operating system without you losing all your saved data or settings.
Note: Performing a system repair will remove any updates you have previously installed which are not on your CD. All drivers will be reverted to their original versions and also some settings, like network and performance settings. It may also be necessary to reactivate windows as well.
step 1: What caused the problem
You should first try to find out what caused the problem. Most of the time when windows becomes unable to boot, there is usually a good reason. Often this can be due to hardware failure (bad hard drive, memory or CPU). If this is the case, using system repair will not fix the problem. System repair will only repair your operating system software.
Step 2: Starting the repair process
You must boot from XP/2000 CD. Make sure you have the same version of windows which is installed on your computer ( XP home edition cannot repair XP professional). Place the CD into your drive and then restart your computer.
Before the windows logo appears you will be prompted to press any key to boot from CD, press any key.
Step 3: Repairing your system
A blue screen will appear and start loading XP setup from from the CD.
RAID/SCSI/Unsupported UDMA users:
You will be prompted to "press F6 to install any third party SCSI or RAID drivers". Most users will not need to press the F6 key unless you are using RAID, SCSI or any unsupported ATA controllers, then you will need your controller drivers on a floppy disk. If you are not sure if you have RAID/SCSI, just let the CD load without pressing F6.
Once completed, you will see the windows setup screen. You will then be asked to setup windows, or repair windows using the recovery console, at this point select the first option, do not choose the recovery console option.
Select F8 to continue
Next, windows setup will find existing windows installations. You will then be asked to repair an existing XP installation or install a fresh copy of windows.
If no installations were found, you will not be given an option to repair. This will usually happen if the data or partition on your hard drive has become too corrupted.
That's it, windows appears to be installing itself for the first time, but it will keep all of your data and settings. follow the prompts and when finished you should be able to boot into windows.
 Protecting Yourself, Your Hardware, and Your Software
when you work on your computer it is possible to harm the computer and yourself. The most common accident which happens while attempting to fix a computer problem is erasing software and data. unless you know what you are doing, you can cause damage. To prevent these sorts of accidents, and also the physically dangerous ones, you only need to take a few safety precautions. The text below will describe the potential sources of damage to computers and how to protect your computer and yourself against them.
Power to the Computer
To protect yourself and the computer components while working inside a computer, turn the power off, unplug the computer, and always ground yourself to discharge any static electricity built up in your body, either by wearing an anti static wrist band or by touching any unpainted part of the computer case.
Think of the monitor and the power supply unit (PSU) as "black boxes". Never remove the covers unless you know about the hazards of charged capacitors. The power supply unit and the monitor can hold dangerous levels of electricity even after they are turned off and disconnected from the power source.
Protecting the computer against electrostatic discharge (ESD), more commonly known as static electricity, always ground yourself before touching any of the electronic components, including the hard drive, motherboard, expansion cards, processors and memory modules. there are a number of ways you can ground yourself and the computer components by using one of the methods below.
Ground bracelet or anti static wrist strap: A ground bracelet is a strap you wear around your wrist. the other end is attached to a grounded conductor such as the computer case or a ground mat or it can be plugged into a wall outlet (Note: only the ground prong makes a connection!). The bracelet also contains a current-limiting resistor which prevents electricity from harming you.
Ground Mats: Ground mats usually come equipped with a cord to plug into a wall outlet to provide a grounded surface to work on. Remember if you lift the component off the mat, it is no longer grounded and susceptible to ESD.
Static Shielding Bags: All new components are supplied in static shielded bags. It is a good idea to save these bags to store spare computer components in to keep them protected from ESD.
The best solution for protecting against ESD is to use a ground bracelet together with a ground mat. You should consider a ground bracelet to be essential equipment while working on a computer. if you find yourself in a situation when your without one, touch the computer case before you touch any components. Leave components inside their protective bags until they are ready to be used. Work on hard floors, not carpet, because walking on and shuffling your feet on carpet generates static electricity. Generally, don't work on a computer if you or the computer have just come inside from the cold.
When handling motherboards and expansion cards, don't touch the chips on the boards. don't stack the boards on top of each other, which could accidentally dislodge a chip. hold cards by the edges, but be careful not to touch the connections of the cards.
Don't touch the chips with a magnetized screwdriver. when using a multimeter to measure electricity, be careful not to touch a chip with the probes. when changing DIP switches, don't use a graphite pencil, because graphite conducts electricity; a small screwdriver works the best. Do not store expansion cards within one foot of the monitor, because the monitor can discharge as much as 29,000 volts of ESD onto the screen.
Protecting Hard Drives and Disks
Always turn the computer off before moving it, to protect the hard drive, which is always spinning while the computer is turned on (unless the drive has a sleep mode). Never jar a computer while the hard disk is running. Avoid placing a PC on the floor, where the user can accidentally kick it.
Follow the user precautions to protect disks. keep them away from magnetic fields, heat and extreme cold. Treat disks with care and they will last for years.
 Google Search Secrets
Google is clearly the mot popular general-purpose search engine on the Internet today
But most people don't use it to its best advantage. Do you just type in a keyword or two and hope for the best? This may be the quickest and simplest way to search, but with more than 3 billion pages in Google's index, there's an easier way to get the results to a manageable number.
Google is a powerful tool which eases and enhances your Internet exploring. Google's search options go beyond simple keywords, the Web, and even its own programmers. Let's look at some of Google's lesser-known options.
Syntax Search Tricks
Using a special syntax is a way to tell Google that you want to restrict your searches to certain elements or characteristics of Web pages. Google has a fairly complete list of its syntax elements at
www.google.com/help/operators.html
Here are some advanced operators that can help narrow down your search results.
Intitle: placed at the beginning of a query word or phrase (intitle:"Google search") restricts your search results to just the titles of the Web pages.
Intext: does the opposite of intitle:, searching only the body text, ignoring titles, links, and so forth. Intext: is perfect when what you're searching for might commonly appear in URLs. If you're looking for the term HTML, for example, and you don't want to get results such as
www.mysite.com/index.html
you can enter intext:html.
Link: lets you see which pages are linking to your Web page or to another page you're interested in. For example, try typing in
link:http://www.pcmag.com
Try using site: (which restricts results to top-level domains) with intitle: to find certain types of pages. For example, get scholarly pages about your favourite author by searching for intitle:"favourite author"site:edu.
Experiment with mixing various elements; you'll develop several strategies for finding the stuff you want more effectively.
The site: command is very helpful as an alternative to the mediocre search engines built into many sites.
Google has a number of services that can help you accomplish tasks you may never have thought to use Google for. For example, the new calculator feature
(www.google.com/help/features.html#calculator)
lets you do both math and a variety of conversions from the search box.
Google can help you find out if you've got the right spelling—and the right word—for your search. Enter a misspelled word or phrase into the query box (try "gougle serch") and Google may suggest a proper spelling. This doesn't always work; it works best when the word you're searching for can be found in a dictionary. Once you search for a properly spelled word, look at the results page, which repeats your query. (If you're searching for "Google search," underneath the search window will appear a statement such as Searched the web for "Google search.") You'll discover that you can click on each word in your search phrase and get a definition from a dictionary.
Lets say you want to contact someone and don't have the phone number handy. Google can help you with that, too. Just enter a name, city, and state. (The city is optional, but you must enter a state.) If a phone number matches the listing, you'll see it at the top of the search results along with a map link to the address.
Extended Googling
Google offers several services that give you a head start in focusing your search. Google Groups
indexes literally millions of messages from decades of discussion on Usenet. Google even helps you with your shopping via two tools: Froogle
(http://froogle.google.com),
which indexes products from online stores, and Google Catalogs
(http://catalogs.google.com),
which features products from more 6,000 paper catalogs in a searchable index. And this only scratches the surface. You can get a complete list of Google's tools and services at
(www.google.com/options/index.html)
You've probably already gotten used to using Google in your browser. But have you ever thought of using Google outside of your browser?
Google Alert
Google alert monitors your search terms and e-mails you information about new additions to Google's Web index. (Google Alert is not affiliated with Google; it uses Google's Web services API to perform its searches.) If you're more interested in news stories than general Web content, check out the beta version of Google News Alerts
This service (which is affiliated with Google) will monitor up to 50 news queries per e-mail address and send you information about news stories that match your query. (Hint: Use the intitle: and source: syntax elements with Google News to limit the number of alerts you get.)
Google on the telephone? This service is brought to you by Google Labs
a place for experimental Google ideas and features (which may come and go, so what's there at this writing might not be there when you decide to check it out). With Google Voice Search you dial the Voice Search phone number, speak your keywords, and then click on the indicated link. Every time you say a new search term, the results page will refresh with your new query (you must have JavaScript enabled for this to work). Remember, this service is still in an experimental phase, so don't expect 100 percent success.
In 2002, Google released the Google API (application programming interface), this is a way for programmers to access Google's search engine results without violating the Google Terms of Service. A lot of people have created useful applications not available from Google itself, such as Google Alert. For many applications, you'll need an API key, which is available free from
(www.google.com/apis)
Thanks to the many different search properties, Google goes far beyond a regular search engine. Give the tricks in this article a try and You'll be amazed at how many different ways Google can improve your Internet searching.
 How To Test Your Anti- Virus Scanner
 Description
 After installing Virus-Scan software, you may wonder, how do I know if it's working? The answer is a test virus. The EICAR Standard Anti-Virus Test File is a combined effort by anti-virus vendors throughout the world to implement one standard by which customers can verify their anti-virus installations.
Solution
To test your anti-virus installation, copy the following line without brackets and quotes " into its own file (notepad,text document), then save the file with the name EICAR.COM. More detailed instructions are found below.
("X5O!P%@AP[4\PZX54(P^)7CC)7}$EICAR-STANDARD-ANTIVIRUS-TEST-FILE!$H+H*")
The file size will be 68 or 70 bytes.
If the Virus Scan is running and configured correctly, when you try to save the file, Virus Scan will detect the virus. If the Virus Scan is not running, start it and scan the directory that contains EICAR.COM, or right click on the file and select scan with your anti-virus program, When your software scans this file, it will report finding the EICAR test file.
Note that this file is NOT A VIRUS. Delete the file when you have finished testing your installation to avoid alarming other users.
The eicar test virus is available for download from the following web site:
http://www.eicar.org/download/eicar.com
How to create an Eicar.com file
1. Click on Start.
2. Select Run.
3. In the Open box type: notepad
4. Maximize the window.
5. Highlight the following line of text without the quotes and brackets (" ")
("X5O!P%@AP[4\PZX54(P^)7CC)7}$EICAR-STANDARD-ANTIVIRUS-TEST-FILE!$H+H*")
6. Right click on the highlighted text and choose 'copy'.
7. Switch back to Notepad.
8. Right click anywhere inside of Notepad and select 'paste'.
9. Click the File menu and select 'save as'.
10. Change the 'Save as Type' to 'all files'.
11. Name the file eicar.com.
 Installing a DVD/CD Optical Drive
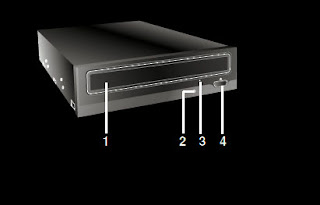
Front Panel
3. Emergency Eject Hole
4. Stop/Eject Button
Rear Panel
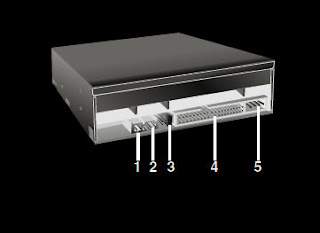 1. Digital Audio Output Connector
 This connector is not usually required or supported by the device.
2. Analog Audio Output Connector
Connect to a sound card. This connection is not normally required.
3. Jumper Connector
This jumper determines whether the drive is configured as the master or slave drive.
4. IDE Interface Connector
Connect to the IDE (Integrated Device Electronics) Interface using a 40-pin flat IDE cable.
NOTE : Do not connect or disconnect the cable when the power is on, as this could cause a short circuit and damage the system. Always turn the power OFF when connecting or disconnecting this cable.
5. Power Connector
Installing the Drive
Before installing the drive, please note the following points.
■ You will need the following:
• A screw driver of a suitable size to fit the securing screws for the drive unit.
■ Turn off all peripheral appliances (printer, scanner, etc ) of the computer and the computer itself, and disconnect their power cords from the wall sockets.
■ Discharge any static electricity in your body by touching any unpainted part of the computer covers, etc.
Removing the Computer Cover
Make sure all peripheral devices (printer, scanner, etc ) of the computer and the computer itself are turned off, and then remove the cover. Refer to your computer manual for details about removing the cover.
NOTE : There may be sharp edges inside the computer so take care to avoid injury.
Mounting the Drive
1. Remove the 51/4″ drive bay panel from the computer. Refer to the manual for the computer for details.
2. Insert the drive unit into the bay, you may have to remove the ram chips if there is not enough room. Do not apply excessive pressure to the cables inside the computer.
3. Secure the drive with the screws. If there is not enough space behind the drive, connect the IDE and other cables before securing the drive.
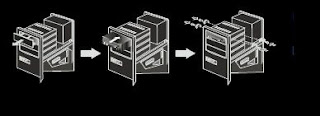
NOTE : This is a general installation guide. If your PC hardware appears different, please consult your
hardware manual for installing peripheral devices.
Jumper Setup
Before installation, set the jumper on the jumper connector on the rear panel.
The drive can be connected as the Master or Slave on an EIDE (ATAPI) interface. When several (up to four) EIDE devices are connected, each must be set in a unique way. Specific knowledge of hardware and software is necessary to install the drive.
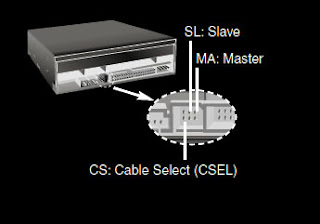 NOTE : If two peripheral devices with the same settings are both connected to the Primary or to the Secondary EIDE bus, the computer may fail to run or may malfunction. Careful attention is necessary.
 NOTE : Only one jumper should be installed on the jumper connector.
If more than one jumper is installed, the drive may malfunction or be damaged.
Master/Slave setting is determined by jumper installation on the Jumper Connector.
The following table shows the possible jumper settings.
If you use CSEL (cable select) setting, the MASTER/SLAVE setting will be made automatically, depending on the hardware configuration. For more details refer to the manual for your computer.
PC Connection
The drive connects to the motherboard of the computer using an IDE interface cable.You can connect the Drive as a Slave or Master device, depending on your motherboard.
To Install as a Master Drive
To install the drive as a Master, the jumper can be left as supplied from the factory, which is their default setting.
NOTE : A hard disk is normally installed as the Primary Master on the EIDE (ATAPI) interface. Other EIDE peripheral devices such as second hard drives and DVD/CD-RW Drives are then set differently.
To Install as a Slave Drive
To install the drive as a Slave drive, change the jumper setting on the rear panel to SL.
Connecting the Power Connector
Connect the power cable from the computer’s power supply to the socket on the drive unit, fitting the connector firmly into the power in connector. If there is no spare power cable available in the computer, you will have to purchase a splitter cable of the same type.
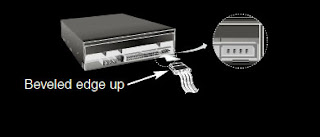 NOTE : Not connecting the power cables correctly can damage the drive. Normally, the
 power connector can only fit one way.
Connecting the Interface Connector
Connect the 40-pin IDE cable to the back of the Drive, making sure the coloured (red) stripe on
the IDE cable is connected to pin 1 on the drive. Pin 1 is closest to the Power Connector.
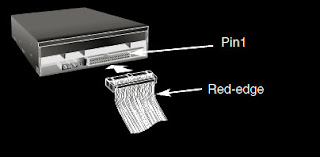
NOTE : normally, the IDE connector is keyed
and will only fit one way.
Connecting the Sound Card
If the computer is using a sound card, the drive is connected to the sound card with an audio
cable. The supplied analog audio cable fits most sound cards or one can be purchased at a local
computer store.
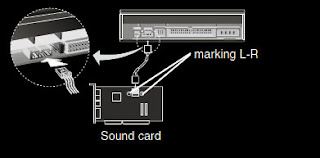 Refer to the manual for the sound card
 for detailed information regarding this
connection.
Replacing the Computer Cover
When the installation of the drive unit is
complete, replace the computer cover.
Device Drivers
When using Windows 2000 Pro/XP or Window NT Workstation Ver. 4.0, no special device driver is required. Your system will find and install the drivers, upon Power On and bootup after installing and connecting the new drive, will recognize and load software drivers automatically.
The DOS and Windows 3.1 users can download the DOS Device drivers via the Internet.
For Windows 2000 Pro/XP Users
.■ In order to ensure normal drive operation, please check the following:
• The drive is displayed in
Windows 2000 Pro/XP : [Control Panel]-[System]-[Hardware]-[Device Manager]-
[DVD/CD-ROM-Drive]
• 32-bit is displayed in [Control Panel]-[System]-[Performance]
■ If the drive is not recognized by your computer, please check the following items.
• If an indicator is displayed on the IDE controller in [Control Panel]-[System]-[Device
Manager]-[Hard Disk Controller], you will need to contact your PC’s manufacturer or the
motherboard’s manufacturer and get the appropriate IDE controller driver.
■ Run Add New Hardware in Control Panel to let PC search again for new device.
For Windows NT Workstation Ver.4.0 Users
■ In order to ensure normal drive operation, please check to see if the drive is displayed on
the IDE controller in [Control Panel]-[SCSI Adapter]-[Device]
■ If the drive is not recognized by your computer, an indicator is displayed on the IDE
controller in [Control Panel]-[SCSI Adapter]-[Devices], you will need to contact your PC’s
manufacturer or the motherboard’s manufacturer and get the appropriate IDE controller driver.
How to Use Disks
When using CD-ROM discs or DVD discs, don’t put any stickers or labels to the discs. Using
discs with them attached will cause read and write errors and also damage the disc.
 The Discs in DVD/CD drives rotate at a very high
 speed! DO NOT use damaged, cracked or
warped discs. The drive’s optical unit may be
damaged if they break.
Emergency Eject
Most DVD/CD drives have a feature that allows the CD to be ejected manually if necessary such as failure of the drive or a power outage.
NOTE: Don’t use this feature except in an emergency.
1) Turn the power to OFF.
2) Poke a fine-tipped object (such as a straightened heavy duty paper clip) into the small hole
above the eject button. The front door will pop open and the disk tray will come partway out.
3) Pull the front door to open it all the way, then grip the disc tray between thumb and forefinger and pull it straight out.
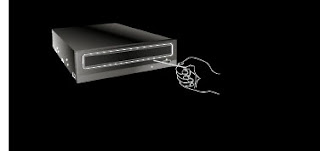 NOTE: This feature is a last measure to
 be used only in an emergency.
Using it excessively will cause the drive to malfunction.
Troubleshooting a DVD/CD Drive
• The drive doesn’t have power.
• Is the power supply cable from the host computer plugged in?
• Is the Power Connector to the drive securely attached?
• The system doesn’t start.
• Are the Primary and Secondary connections and the Master and Slave settings correct?
• Is the total length of the IDE cable 18 inches or less?
• Is each connector completely attached?
Movement of the PC may loosen connections.
• Cannot Read or Write Discs.
• Is the condition of everything else in the system (CPU, hard disc, and others)
as it should be?
• Does the CD, DVD disc have dirt or scratches?
• Did a screen saver or other application operate while writing to the disc?
• Is there enough free space on the CD, DVD disc?
• Does writing fail even using the simulation test?
• Is the disc loaded in the drive with the read/write surface facing the right direction?
(label up)
• Is the drive installed in the correct orientation?
• Was the drive or disc moved from a low temperature environment to a high temperature
environment? (There is a possibility of condensation on the lens in the drive or on the
surface of the disc.)
 10 Reasons Why Computers Crash
Fatal error: the system has become unstable or is busy," it says. "Enter to return to Windows or press Control-Alt-Delete to restart your computer. If you do this you will lose any unsaved information in all open applications."
You have just been hit by the Blue Screen of Death. Anyone who uses Microsoft Windows will be familiar with this. What can you do? More importantly, how can you prevent it from happening?
1 Hardware conflict
The number one reason why Windows crashes is hardware conflict. Each hardware device communicates to other devices through an interrupt request channel (IRQ). These are meant to be unique for each device.
For example, a printer usually connects internally on IRQ 7. The keyboard usually uses IRQ 1 and the floppy disk drive IRQ 6. Each device will try to use a single IRQ for itself.
If you have a lot of devices connected to your computer, or if they are not installed properly, two of them can end up sharing the same IRQ number. When the user tries to use both devices at the same time, a crash can happen. To check if your computer has a hardware conflict is through the device manager:
* Start/Settings/Control Panel/System/Device Manager.
If a device has a problem a yellow '!' appears next to its description in the Device Manager. Highlight Computer (in the Device Manager) and press Properties to see the IRQ numbers used by your computer, if no numbers appear select the "view" tab then "resources by type" and then interrupt request (IRQ). If the IRQ number appears twice, two devices may be using it.
Often a device might share an IRQ with something described as 'IRQ holder for PCI steering'. This can be ignored. The easiest way to fix this problem is to uninstall the problem device and then reinstall it.
If the device is a sound card, or a modem, it can usually be fixed by moving it to a different slot on the motherboard (be careful about opening your computer, as you may void the warranty).
When working inside a computer make sure its switched off, unplug the mains lead and touch an unpainted metal surface to discharge any static electricity in your body.
To be fair to Microsoft, the problem with IRQ numbers is not their fault. It is a legacy problem going back to the first PC designs using the IBM 8086 chip.
Initially there were only eight IRQs. Today there are 16 IRQs in a PC. It is easy to run out of them. There are plans to increase the number of IRQs in future designs.
2 Bad Ram
Ram (random-access memory) problems might bring on the blue screen of death with a message saying Fatal Exception Error. A fatal error indicates a serious hardware problem. Sometimes it may mean a part is damaged and will need replacing.
But a fatal error caused by Ram might be caused by a mismatch of chips. For example, mixing 70-nanosecond (70ns) Ram with 60ns Ram will usually force the computer to run all the Ram at the slower speed. This will often crash the machine if the Ram is overworked.
One way around this problem is to enter the BIOS settings and increase the wait state of the Ram. This can make it more stable. Another way to troubleshoot a suspected Ram problem is to rearrange the Ram chips on the motherboard, or take some of them out. Then try to repeat the circumstances that caused the crash.
When handling Ram try not to touch the gold connections, as they can be easily damaged.
Parity error messages also refer to Ram. Modern Ram chips are either parity (ECC) or non parity (non-ECC). It is best not to mix the two types, as this can be the cause of trouble.
EMM386 error messages refer to memory problems but may not be connected to bad Ram. This may be due to free memory problems often linked to old Dos-based programs.
3 BIOS settings
Every motherboard is supplied with a range of chipset settings that are decided in the factory. A common way to access these settings is to press the F2 or delete button during the first few seconds of a boot-up.
Once inside the BIOS, care should be taken. It is a good idea to write down on a piece of paper all the settings that appear on the screen. That way, if you change something and the computer becomes more unstable, you will know what settings to revert to.
A common BIOS error concerns the CAS latency. This refers to the Ram. Older EDO (extended data out) Ram has a CAS latency of 3. Newer SD Ram has a CAS latency of 2. Setting the wrong figure can cause the Ram to lock up and freeze the computer's display.
Microsoft Windows is better at allocating IRQ numbers than any BIOS. If possible set the IRQ numbers to Auto in the BIOS. This will allow Windows to allocate the IRQ numbers (make sure the BIOS setting for Plug and Play OS is switched to 'yes' to allow Windows to do this.).
4 Hard disk drives
After a few weeks, the information on a hard disk drive starts to become fragmented. It is a good idea to defragment the hard disk every week or so, to prevent the disk from causing a screen freeze. Go to
* Start/Programs/Accessories/System Tools/Disk Defragmenter
This will start the procedure. You will be unable to write data to the hard drive (to save it) while the disk is defragmenting, so it is a good idea to schedule the procedure for a period of inactivity using the Task Scheduler.
The Task Scheduler should be one of the small icons on the bottom right of the Windows desktop on the task bar.
Hard disks will slow down and crash if they are too full. Do some housekeeping on your hard drive every few months and free some space on it. Open the Windows folder on the C drive and find the Temporary Internet Files folder. Deleting the contents (not the folder) can free a lot of space.
Empty the Recycle Bin every week to free more space. Hard disk drives should be scanned every week for errors or bad sectors. Go to
* Start/Programs/Accessories/System Tools/Scan Disk
Otherwise assign the Task Scheduler to perform this operation at night when the computer is not in use.
5 Fatal OE exceptions and VXD errors
Fatal OE exception errors and VXD errors are often caused by video card problems.
These can often be resolved easily by reducing the resolution of the video display. Go to
* Start/Settings/Control Panel/Display/Settings
Here you should slide the screen area bar to the left. Take a look at the colour settings on the left of that window. For most desktops, high colour 16-bit depth is adequate.
If the screen freezes or you experience system lockups it might be due to the video card. Make sure it does not have a hardware conflict. Go to
* Start/Settings/Control Panel/System/Device Manager
Select the + beside Display Adapter. A line of text describing your video card should appear. Highlight it and press properties. Then select Resources and select each line in the window. Look for a message that says No Conflicts.
If you have video card hardware conflict, you will see it here. Be careful at this point and make a note of everything you do in case you make things worse.
The way to resolve a hardware conflict is to uncheck the Use Automatic Settings box and hit the Change Settings button. You are searching for a setting that will display a No Conflicts message.
Another useful way to resolve video problems is to go to
* Start/Settings/Control Panel/System/Performance/Graphics
Here you should move the Hardware Acceleration slider to the left. The most common cause of problems relating to graphics cards is old or faulty drivers (a driver is a small piece of software used by a computer to communicate with a device).
Look up your video card's manufacturer on the Internet and search for the most recent drivers for it.
6 Viruses
Often the first sign of a virus infection is instability. Some viruses erase the boot sector of a hard drive, making it impossible to start. This is why its a good idea to create a Windows start-up disk. Go to
* Start/Settings/Control Panel/Add/Remove Programs
Look for the Start Up Disk tab. Virus protection requires constant vigilance.
A virus scanner requires a list of virus signatures in order to be able to identify viruses. These signatures are stored in a DAT file. DAT files should be updated weekly from the web site of your anti-virus software manufacturer.
7 Printers
The action of sending a document to print creates a bigger file, often called a postscript file.
Printers have only a small amount of memory, called a buffer. This can be easily overloaded. Printing a document also uses a considerable amount of CPU power. This will also slow down the computer's performance.
If the printer is trying to print unusual characters, these might not be recognised, and can crash the computer. Sometimes printers will not recover from a crash because of confusion in the buffer. A good way to clear the buffer is to unplug the printer for ten seconds. Booting up from a powerless state, also called a cold boot, will restore the printer's default settings and you should be able to carry on.
8 Software
A common cause of computer crash is faulty or badly-installed software. Often the problem can be cured by uninstalling the software and then reinstalling it.
The System Registry can be corrupted by old references to obsolete software that you thought was uninstalled. There are plenty of free registry cleaners available Regscrub XP and easycleaner are two good one's.
Often a Windows problem can be resolved by entering Safe Mode. This can be done during start-up. When you see the message "Starting Windows" press F4. This should take you into Safe Mode.
Safe Mode loads a minimum of drivers. It allows you to find and fix problems that prevent Windows from loading properly.
Sometimes installing Windows is difficult because of unsuitable BIOS settings. If you keep getting SUWIN error messages (Windows setup) during the Windows installation, then try entering the BIOS and disabling the CPU internal cache. Try to disable the Level 2 (L2) cache if that doesn't work.
Remember to restore all the BIOS settings back to their former settings following installation.
9 Overheating
Central processing units (CPUs) are usually equipped with fans to keep them cool. If the fan fails or if the CPU gets old it may start to overheat and generate a particular kind of error called a kernel error. This is a common problem in chips that have been over clocked to operate at higher speeds than they are supposed to.
One remedy is to get a bigger better fan and install it on top of the CPU.
CPU problems can often be fixed by disabling the CPU internal cache in the BIOS. This will make the machine run more slowly, but it should also be more stable.
10 Power supply problems
A power surge or spike can crash a computer and damage the CPU and motherboard as easily as a power cut.
If this has become a nuisance for you then consider buying a uninterrupted power supply (UPS). This will give you a clean power supply when there is electricity, and it will give you a few minutes to perform a controlled shutdown in case of a power cut.
It is a good investment if your data are critical, because a power cut will cause any unsaved data to be lost.
 Windows Updates
Weaknesses discovered in windows after its release make these threats possible.
Fortunately windows is easy to keep up to date by performing windows update automatically, when prompted or manually.
Windows ME, 2000 and XP:
Setting windows update, to automatically download and install updates is recommended for most users.
Right click "My Computer"
Click "Properties"
Click "Automatic Updates"
Select "Automatic (Recommended)"
Under this setting is the day and time to download the updates, every day is recommended and set the time for when you normally have your computer switched on.
To manually update your computer:
Click "Start/All Programs/Windows Update"
Then follow the prompts.
 100 Keyboard Shortcuts For Windows
CTRL+C (Copy)
CTRL+X (Cut)
CTRL+V (Paste)
CTRL+Z (Undo)
DELETE (Delete)
SHIFT+DELETE (Delete the selected item permanently without placing the item in the Recycle Bin)
CTRL while dragging an item (Copy the selected item)
CTRL+SHIFT while dragging an item (Create a shortcut to the selected item)
F2 key (Rename the selected item)
CTRL+RIGHT ARROW (Move the insertion point to the beginning of the next word)
CTRL+LEFT ARROW (Move the insertion point to the beginning of the previous word)
CTRL+DOWN ARROW (Move the insertion point to the beginning of the next paragraph)
CTRL+UP ARROW (Move the insertion point to the beginning of the previous paragraph)
CTRL+SHIFT with any of the arrow keys (Highlight a block of text)
SHIFT with any of the arrow keys (Select more than one item in a window or on the desktop, or select text in a document)
CTRL+A (Select all)
F3 key (Search for a file or a folder)
ALT+ENTER (View the properties for the selected item)
ALT+F4 (Close the active item, or quit the active program)
ALT+ENTER (Display the properties of the selected object)
ALT+SPACEBAR (Open the shortcut menu for the active window)
CTRL+F4 (Close the active document in programs that enable you to have multiple documents open simultaneously)
ALT+TAB (Switch between the open items)
ALT+ESC (Cycle through items in the order that they had been opened)
F6 key (Cycle through the screen elements in a window or on the desktop)
F4 key (Display the Address bar list in My Computer or Windows Explorer)
SHIFT+F10 (Display the shortcut menu for the selected item)
ALT+SPACEBAR (Display the System menu for the active window)
CTRL+ESC (Display the Start menu)
ALT+Underlined letter in a menu name (Display the corresponding menu)
Underlined letter in a command name on an open menu (Perform the corresponding command)
F10 key (Activate the menu bar in the active program)
RIGHT ARROW (Open the next menu to the right, or open a submenu)
LEFT ARROW (Open the next menu to the left, or close a submenu)
F5 key (Update the active window)
BACKSPACE (View the folder one level up in My Computer or Windows Explorer)
ESC (Cancel the current task)
SHIFT when you insert a CD-ROM into the CD-ROM drive (Prevent the CD-ROM from automatically playing)
Dialogue Box Keyboard Shortcuts
CTRL+TAB (Move forward through the tabs)
CTRL+SHIFT+TAB (Move backward through the tabs)
TAB (Move forward through the options)
SHIFT+TAB (Move backward through the options)
ALT+Underlined letter (Perform the corresponding command or select the corresponding option)
ENTER (Perform the command for the active option or button)
SPACEBAR (Select or clear the check box if the active option is a check box)
Arrow keys (Select a button if the active option is a group of option buttons)
F1 key (Display Help)
F4 key (Display the items in the active list)
BACKSPACE (Open a folder one level up if a folder is selected in the Save As or Open dialogue box)
Microsoft Natural Keyboard Shortcuts
Windows Logo (Display or hide the Start menu)
Windows Logo+BREAK (Display the System Properties dialogue box)
Windows Logo+D (Display the desktop)
Windows Logo+M (Minimize all of the windows)
Windows Logo+SHIFT+M (Restore the minimized windows)
Windows Logo+E (Open My Computer)
Windows Logo+F (Search for a file or a folder)
CTRL+Windows Logo+F (Search for computers)
Windows Logo+F1 (Display Windows Help)
Windows Logo+ L (Lock the keyboard)
Windows Logo+R (Open the Run dialogue box)
Windows Logo+U (Open Utility Manager)
Accessibility Keyboard Shortcuts
Right SHIFT for eight seconds (Switch Filter Keys either on or off)
Left ALT+left SHIFT+PRINT SCREEN (Switch High Contrast either on or off)
Left ALT+left SHIFT+NUM LOCK (Switch the Mouse Keys either on or off)
SHIFT five times (Switch the Sticky Keys either on or off)
NUM LOCK for five seconds (Switch the Toggle Keys either on or off)
Windows Logo +U (Open Utility Manager)
Windows Explorer Keyboard Shortcuts
END (Display the bottom of the active window)
HOME (Display the top of the active window)
NUM LOCK+Asterisk sign (*) (Display all of the sub folders that are under the selected folder)
NUM LOCK+Plus sign (+) (Display the contents of the selected folder)
NUM LOCK+Minus sign (-) (Collapse the selected folder)
LEFT ARROW (Collapse the current selection if it is expanded, or select the parent folder)
RIGHT ARROW (Display the current selection if it is collapsed, or select the first sub folder)
Shortcut Keys for Character Map
After you double-click a character on the grid of characters, you can move through the grid by using the keyboard shortcuts:
RIGHT ARROW (Move to the right or to the beginning of the next line)
LEFT ARROW (Move to the left or to the end of the previous line)
UP ARROW (Move up one row)
DOWN ARROW (Move down one row)
PAGE UP (Move up one screen at a time)
PAGE DOWN (Move down one screen at a time)
HOME (Move to the beginning of the line)
END (Move to the end of the line)
CTRL+HOME (Move to the first character)
CTRL+END (Move to the last character)
SPACEBAR (Switch between Enlarged and Normal mode when a character is selected)
Microsoft Management Console (MMC) Main Window Keyboard Shortcuts
CTRL+O (Open a saved console)
CTRL+N (Open a new console)
CTRL+S (Save the open console)
CTRL+M (Add or remove a console item)
CTRL+W (Open a new window)
F5 key (Update the content of all console windows)
ALT+SPACEBAR (Display the MMC window menu)
ALT+F4 (Close the console)
ALT+A (Display the Action menu)
ALT+V (Display the View menu)
ALT+F (Display the File menu)
ALT+O (Display the Favourites menu)
MMC Console Window Keyboard Shortcuts
CTRL+P (Print the current page or active pane)
ALT+Minus sign (-) (Display the window menu for the active console window)
SHIFT+F10 (Display the Action shortcut menu for the selected item)
F1 key (Open the Help topic, if any, for the selected item)
F5 key (Update the content of all console windows)
CTRL+F10 (Maximize the active console window)
CTRL+F5 (Restore the active console window)
ALT+ENTER (Display the Properties dialogue box, if any, for the selected item)
F2 key (Rename the selected item)
CTRL+F4 (Close the active console window. When a console has only one console window, this shortcut closes the console)
Remote Desktop Connection Navigation
CTRL+ALT+END (Open the Microsoft Windows NT Security dialogue box)
ALT+PAGE UP (Switch between programs from left to right)
ALT+PAGE DOWN (Switch between programs from right to left)
ALT+INSERT (Cycle through the programs in most recently used order)
ALT+HOME (Display the Start menu)
CTRL+ALT+BREAK (Switch the client computer between a window and a full screen)
ALT+DELETE (Display the Windows menu)
CTRL+ALT+Minus sign (-) (Place a snapshot of the active window in the client on the Terminal server clipboard and provide the same functionality as pressing
PRINT SCREEN on a local computer.)
CTRL+ALT+Plus sign (+) (Place a snapshot of the entire client window area on the Terminal server clipboard and provide the same functionality as pressing
ALT+PRINT SCREEN on a local computer.)
Microsoft Internet Explorer Navigation
CTRL+B (Open the Organize Favourite dialogue box)
CTRL+E (Open the Search bar)
CTRL+F (Start the Find utility)
CTRL+H (Open the History bar)
CTRL+I (Open the Favourites bar)
CTRL+L (Open the Open dialogue box)
CTRL+N (Start another instance of the browser with the same Web address)
CTRL+O (Open the Open dialogue box, the same as CTRL+L)
CTRL+P (Open the Print dialogue box)
CTRL+R (Update the current Web page)
CTRL+W (Close the current window)
 computer maintenance
A computer needs some basic maintenance to improve its life span and performance. Following this simple guide you will save money on computer repair and computer support as well as have a secured computer.
Tip: Click On Images For Larger View
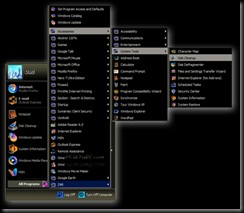
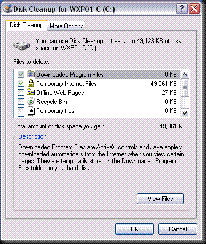
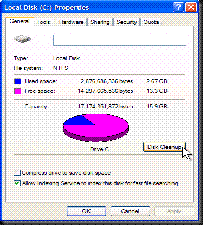
1. Disk cleanup: to access Disk Cleanup click Start/All Programs/Accessories/System Tools, click on Disk Cleanup, check all of the boxes except compress files by clicking one at a time, then click on OK or yes. Disk Cleanup should be done at least once a week.
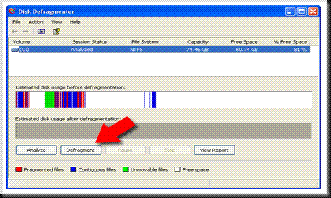
2. Disk Defragmenter: Over time files become defragmented on your hard drive, this happens when you open a file then make changes to it, then when you save it, its to big to put back where windows retrieved it from, so windows saves one part there and another part somewhere else on the hard drive, so now the file has become fragmented and the more fragmented a file is the longer it takes windows to open it. To access Disk Defragmenter click start/All Programs/System Tools, click on Disk Defragmenter , if you want to analyse the disk before defragmenting it select the (Analyse) button. A colour chart will show the amount of fragmentation. The more red you see in the chart the worse the defragmentation is. Disk Defragmenter can take several hours to complete so its best done when your away from your computer for a while, you should disable your screen saver and close all other applications before starting a Defragmentation of the hard disk, when your ready just click on the Defragment button to start the process. You can defragment other drives as well, just select which drive you want to defragment on the defragmenter.
3. Computer virus protection: With new viruses being introduced almost daily its very important to keep you anti virus program up to date with the latest virus definitions. Viruses aren't the only security problem, these days we have to worry about spy ware, ad ware, malware, key loggers and root kits. There are plenty of free anti spy ware and ad ware programs available to download. Spybot -search and destroy is a good free security software utility and should be run at least once a week. Ad aware form Lavasoft is a good free ad ware program which should be run at least once a week. A good free virus software is AVG free anti virus protection.
4. Run a full anti-virus scan: you should run a full anti-virus scan of all your hard disks once a week as well as any other security program you might have.
5. Keep Windows up to date: Make sure automatic updates are turned on, these updates are are fixes for security vulnerabilities and patches from Microsoft.
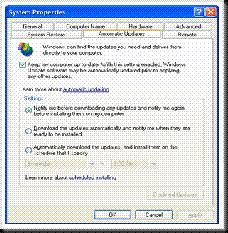

6. Back up important files: most of your important files will be in your my documents folder and should be backed up at least once a week.
7. Install a firewall: Lets face it, the Windows firewall isn't exactly up to scratch, so installing a third party firewall Will greatly increase your security and there are some good free one's available to download, i recommend Zone Alarm or Ashampoo's free firewall. Only one firewall should be used.
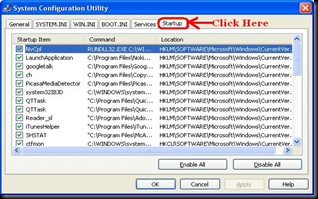
8. Clean up your start up items: The more programs that start with your computer the slower it will boot up, everything you see in your system tray (down by the clock in the right hand corner) starts with your computer, to clean these up click Start/ Run, and then type msconfig in the open box then click OK. Click on the startup tab the uncheck any items that you don't need to start with windows, if your unsure what the item does, do not uncheck it.
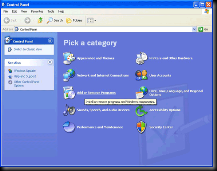
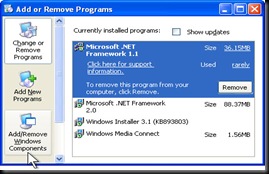
9. Clean up programs that you no longer use or need: Just deleting a short cut or icon doesn't uninstall the program, to uninstall a program click Start/Control Panel/Add Remove programs and go through the list and remove any computer video games and computer programs you no longer use, if your unsure what the program is for or what it is, do not remove it.
10. To check your drive space: To see how much space is left on your hard computer system, open my computer and right click on C: then select properties, a pie chart will show you how much space is left on your hard drive. You can do the same with any other drives or partitions you may have.
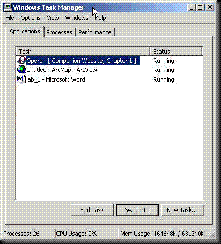
11. If your computer is freezing or hanging up: press Control+Alt+Delete to bring up the task manager, select the offending program and select end task, if all else fails, press the power button (you usually need to hold it in for about 5 seconds) to shut down your computer, wait about 10 seconds then restart your computer.
12. Tip: If you keep getting the same error message, try to copy and paste it into a search bar like Google, this should give an explanation of the error code as well as links to try to resolve the matter.
Posts
- Solve Boot Issues
- Windows 7 Tips And Tricks 3
- Windows 7 Tips And Tricks 2
- Windows 7 Tips And Tricks
- Security In Windows
- Maintaining Windows
- Windows XP Interface
- Computer Acronyms Explained
- Restoring Windows XP to a Previous State
- How to Repair Windows
- Protecting Yourself, Your Hardware, and Your Software
- Google Search Secrets
- How To Test Your Anti- Virus Scanner
- Installing a DVD/CD Optical Drive
- 10 reasons why PCs crash, you must Know
- Windows Updates
- 100 Keyboard Shortcuts For Windows
- computer maintenance


